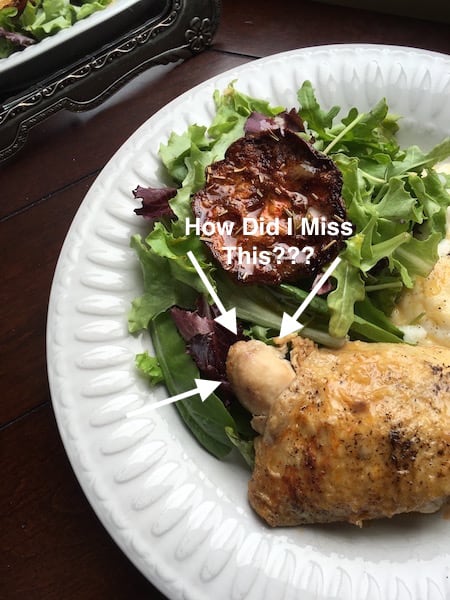
Posted on

Monetization Monday: Making the Most of Your Best Posts

Happy Monetization Monday!

Today, I have a quick Monetization challenge for you. Go into Google Analytics (or whatever stat tracking program you use) and find your top 5 blog posts (or more if you have time).


Then, open up a new Excel document and add the name of the post, the url, and where the traffic is coming from (if you aren’t sure, what’s your best guess – organic, Facebook, Pinterest, etc…) in 3 columns.


Next, add a 4th column titled “Call to Action” or “Monetization Strategy” or something along those lines.


Now it’s time to take a closer look at each post. Look at each post with a “fresh set of eyes” and ask yourself … Is it obvious what you want your readers to do next after landing on your best content? 


In other words, does your best content feature a clear call-to-action to guide your readers to a) join your email list, b) join your Facebook group, c) buy your cookbook, d) hire you (if you offer services in addition to digital content), e) check out an affiliate offer (I’d try to get them on your list before you send them away to another offer, but sometimes it’s worth it go this route), or e) whatever your goal was in writing that post?


You may find you didn’t have a specific goal when you created that post. That’s okay. Now’s your chance to rectify it. 

Once you’ve worked out how you want to Monetize your top posts (if you haven’t already done so, of course!) – drop by the KitchenBlogger’s private Facebook group  and share a link to one of your newly Monetized posts in this thread:

https://www.facebook.com/groups/kitchenbloggers/permalink/856028914573606/

(Our private Facebook group is closed, but free to join. If you are not a member, just submit a request to join and I’ll get you in right away!) 


I’ll be keeping an eye on this thread and spot checking pages and offering feedback.

If you have questions, leave a comment on the Facebook thread and I’ll get back to you! 

That’s all I have for now.

‘Til Next Time,

Posted on

How to Write Fantabulous Product Reviews for Your Food Blog

I’ve long been a fan of publishing product reviews because they are a great way to serve your audience. If you invest the time to research different options or share why you love your favorite kitchen tools, you can save your readers a lot of time, money, and frustration in the long run.

Even if you find you really DISLIKE a product, you can still help your audience by letting them know what issues you experienced AND then offer alternatives that solve the problems you encountered.

What’s more, I’ve consistently made money by publishing in-depth product reviews. Here’s what works for me:


  • Always include pros and cons in every review. No product is perfect for everyone – so if a review is too over-the-top, it will lack credibility. A product review isn’t meant to be a hard core sales pitch. Instead, your goal is to help your readers find the best resources for them.
    .
  • Provide alternatives. When you include a valid “con” in your review – go the extra step to share viable alternatives. For example, if Product A has a high price tag, offer Product B as a lower cost alternative, (but explain what the trade off is for the lower cost). Again, your “job” is to help them choose the best solution, not to hard sell them on anything.
    .
  • Show how you use the tool or appliance in your own kitchen. If you don’t own the product, share ideas for how the tool or appliance can help them save time, save money, or achieve a healthier lifestyle. The easier you can make it for your readers to picture themselves achieving these results, the more likely they will be to invest in one for themselves.
    .
  • Understand the difference between features and benefits – and focus on the benefits. I spent my 20+ year corporate career in outside sales and marketing, and I can’t begin to tell you how many hours I’ve spent translating features into benefits that matter to customers.
    .
    A feature is merely a fact about a product, while a benefit is the value derived from it. The fact the Vitamix 64-oz. container incorporates the stainless steel blades into a single integrated unit is a feature. On its own, this fact doesn’t mean much. However, once you explain how fast and easy this design makes it to clean up after your morning smoothie without needing to disassemble and tinker with sharp blades and other parts, your readers can begin to see how this might make their morning routine a little bit easier.
    .
    Bottom Line: People don’t buy “features.” They buy the value those features give them, so share lots of real life examples with them to show how Product X can make their life better, easier, or more fun. 🙂
    .
  • A picture is worth a thousand words. So, include pictures – especially of your own favorite tools and appliances in use as you create your favorite recipes! If you don’t own a specific product, use a stock photo or use one from the manufacturer or retailer (make sure you have permission first).
    .
  • Send a note to your audience (via email and on social media) once your review is published. As you consistently share great material with your readers, you will become a trusted resource to them. Give them a little backstory on the review – why you decided to tackle it, why they might find it worthwhile, etc… Let them know you took the time to review the top products in X category for them – and would love to know their thoughts.
    .
    Keep the conversation open and ongoing. People appreciate when you genuinely try to make their lives easier.
    .
    TIP: Add this message to your email autoresponder (remove any timely content about the current weather, time of year, etc…) after you send the original message to your list. This will ensure new subscribers to your list don’t miss some of your best content.
  • Consistently link to your best in-depth product reviews with every new recipe you add that utilizes that tool or appliance. Content published on your site tends to get “buried” over time, but linking to it repeatedly from new posts will help keep it alive.

  • Always include a clear Call-to-Action. Take the time to spell out “what’s next” so your readers aren’t left wondering what they should do with all the great information you just shared with them.Something as simple as, “If you are ready to stop wasting time and money on ______, you can order your __ here” clearly shows your readers where they can order their own item, while reminding them of the benefits of doing so.

In short, I’ve found that the key to long-term success with product reviews is to go the extra mile for your readers – and to consistently over-deliver with a personal touch! 🙂

If you need some help getting started with helpful and profitable product reviews, check out this Healthy Small Kitchen Appliance PLR package. 


‘Til Next Time,

KB_About

Trish

Posted on 1 Comment

How to Make Ready-to-Publish Food Content Fresh and Unique

I have one major “rule” when creating new ready-to-publish food content for KitchenBloggers:

The quality must be good enough that I would be willing to post it “as is” on one of my own websites.


In other words, if it’s not good enough for me, it’s NOT good enough to offer to you.


However, that rule is a bit misleading, because…

I would never post ANY PLR content – including the stuff I write myself – exactly “as is” on my own websites. 


So my own rule is more of a quality guideline than anything! 🙂  In my opinion, PLR is not meant to be used “as is” – it’s a valuable, time-saving resource, but not a finished product by itself.


Let Me Explain: Well-written and thoroughly researched PLR content is a great tool because it allows you to leverage someone else’s time, energy and resources.


For example, I invest more than $200 for ingredients, plus approximately 40 hours each month researching, shopping, cooking, photographing, and writing for my signature Bite-Sized Bundles recipe with original photo packs.


With high-quality PLR, you can let someone else do the heavy lifting of researching a topic and organizing all that material into something useable. Without question, you can save a ton of time and/or money by using good PLR as a starting point.


However… Any PLR – even the really well written variety – lacks the kind of personality and flair only YOU can add to it! By itself, PLR is a bit like one of those promotional cardboard cut-outs instead of the real celebrity… It won’t hold anyone’s attention for very long.


When you think about it, PLR HAS to be somewhat sterile to be usable. If I let my own personality or unique life experiences creep in there, you would “hear” my voice too clearly – and so would your audience.


They don’t come to your website or buy your products to “hear” me – they want YOU.


Therefore, it is up to YOU to breathe some life and character into it. Fortunately, you don’t have to reinvent the wheel to make PLR content uniquely your own. You just need to do some tweaking and share a little bit about yourself in the process. In about 10 – 15 minutes, you can do the following:


  1. Create a New Title. Ideally use the keyword phrase you are targeting for that page or post in your new title. (As long as it is relevant to the content, of course). .
  2. Write a New Intro Paragraph. If you don’t have time to do anything else, at least write your own introduction. Talk about how your mom made the best minestrone soup when you were growing up, but it was never the same from one pot to the next. Explain how she was able to stretch a dollar like nobody’s business by using whatever she had on hand…  Or share how you started using green cleaning supplies because you had a bad allergic reaction to the fumes from a commercial brand… .
    .
    Of course, these are just examples to show how you can weave your own life experiences into your PLR content. Personal life experiences like these are what really resonate with people – not a collection of safe and sterile facts. .
    .
  3. Add a Strong Call-to-Action at the End. Always “blog with intent.” When you put new content on your site or social media platforms, you should have a specific goal you want to accomplish with it. For example, you may want to invite your readers to join your mailing list, leave a comment, share the article or recipe on social media, sign up for your next webinar, or meet you at an upcoming networking event…Again, these are all just examples, but you get the idea. .
    .
    The key here is to pick ONE desired outcome and ASK for it. Don’t leave your audience guessing what they should do next. Give them a very clear “What’s Next” when they get to the end of your article or recipe. Never assume they’ll automatically “just do it.”
    .

I hope you found these tips helpful. If so, be sure put them to work for you right away! If you want more FREE food blog marketing tips like this – be sure to check out our active Facebook group here.

Posted on

How to Use Your “Bad” Food Photos… aka “Attack of the Chicken Turtle”

Has this ever happened to you?

You’re busy cooking up a storm and trying to snap beautiful shots for your food blog at the same time. You get the food plated and the lighting just how you like it… and you happily start snapping away and everything looks GREAT!


This might just be your Best. Work. Ever!

But then later – after you’ve eaten your subject, of course – you take a closer look and realize there is something horribly wrong with your shots. It could be something fairly easy to miss, like an errant dog hair that settled on your otherwise perfect plate or something a little more… MAJOR…

Like a chicken turtle.

Yes, you read that right. I said… Chicken. Turtle. See Exhibit A below.

How to Use Your Bad Food Photos


This was one of those times where once something has been seen, it cannot be unseen. I have no idea how I didn’t notice the little turtle head on my lovely braised chicken thigh while I was taking the shots – but I now have an entire series of otherwise decent pics that feature this weird little guy.


Overall, I liked the composition and color contrast in this picture, but I also didn’t care for the way the olive oil pooled in the roasted tomato. (Is it just me or are those things delicious?!) The way the light caught it made it look greasy.

Boo!

I hated the idea of trashing the whole series because of a little chicken turtle, so I decided to use it in my promotional graphic for my Tastes Like Chicken package.

Here’s how you can salvage your less-than-perfect pics, too. 

The photo editing software I use is Gimp – I like it because it is powerful, flexible and … free. (Just Google ‘Gimp Download’ to find it). Gimp can be a little complicated, so there is a bit of a learning curve to it. Fortunately, it is open-source – so there are a ton of free tutorials available to walk you through it. If you prefer a different photo editing software, that is perfectly fine – use whatever you are comfortable using.

Basically, I just added a series of 3 rectangular shapes over the image – the dark green band on top and 2 transparent white boxes that allowed some of the image to come through, while providing a nice area to add text to explain what is included in the Tastes Like Chicken package.

Here is the final image:

KB_May2016

This concept isn’t just limited to “flawed” pics, by the way. This is also a great way to transform your own pics or those you purchase with PLR rights into something uniquely yours by creating your own social media graphics or cooking tip sheets to share with your readers. 

That’s all I have for now, but will be back shortly with the tutorial. Hope you have an awesome day!

Til Next Time,

KB_newsletter

Trish Lindemood
Chief Cook & Content Creator
KitchenBloggers.com

PS Admit it… you totally looked for the chicken turtle in the final pic, didn’t you?? 🙂 He’s still there, but doesn’t look like he’s about to go exploring around the plate anymore!

Posted on

Lunches to Go Photo Pack

Lunches Photo Pack

If you’re a busy blogger, you know it’s not always easy to stop and take a great photo. That’s why we’re here to help. We’ve got a collection of entertaining food photos, social media graphics and plenty of content ideas to help you.

Lunches Photo Pack | April Foodaplenty Photo Club Membership

This is an archive bundle from our Foodaplenty Photo Club and by purchasing this pack, you get access to all of April 2015’s content.

30 Lunches to Go Photos

Stock photos will cost you anywhere from $1-20 a piece, but we put together a collection of full-sized photos at a fraction of that price.

Lunches Photo Pack | April Photos Included Lunches Photo Pack | April Photos Included April Photos Included

20 Social Media Graphics

We also included 20 graphics, on the monthly theme, perfect for your social media that have quotations, sayings and tips for your audience.

Social Media Graphics Included Social Media Graphics Included

BONUS: Tips Sheet to Help You
Use Your Photos & Create Content

April Tips Sheet
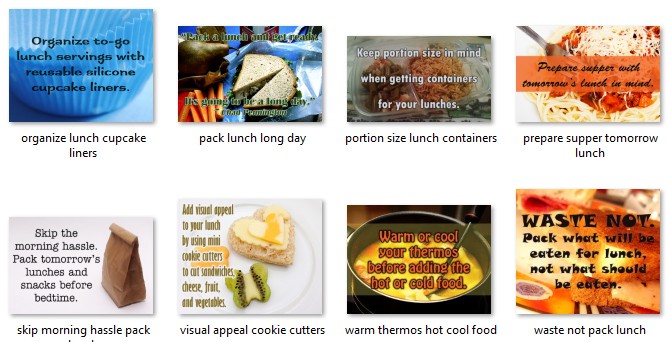
You’ll love this handy extra. It includes:

  • A topic idea for each day
  • Links to suggested recipes to adapt or share
  • Ideas for products to promote
  • Social media tips and ideas

Not only do you get a ton of photos and graphics to work with, you’ll have plenty of ideas for creating tons of content with your photos and more.

12 Random Bonus Food Photos

Here are 12 more full-size food photos with a variety of subjects. Use these for blog posts, recipe books, reports or social media…it’s all up to you. In addition to the 30 full-size photos based on the monthly theme and 20 social media graphics, we’re also throwing in 12 more full-size food photos with a variety of subjects. Use these for blog posts, recipe books, reports or social media…it’s all up to you.


12 Random Photos

Grab it all now, for a limited time, available for a one-time payment $24.97. No memberships or subscriptions required.


Add To Cart